
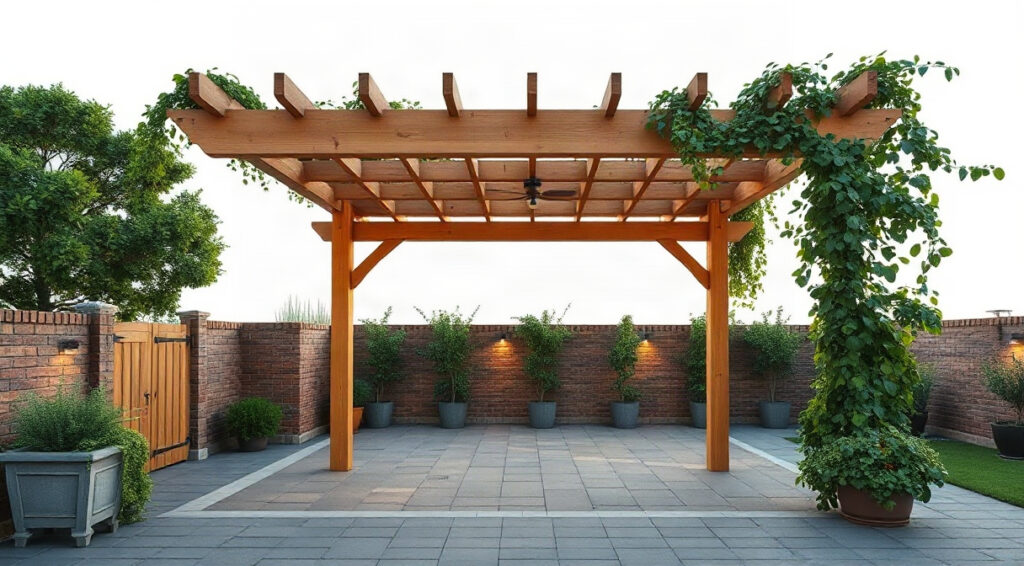
How to build a pergola on a patio starts with more than choosing attractive posts and rafters: the structure must suit the site, attach safely, shed water where needed and feel comfortable in daily use. A pergola can frame an outdoor dining area, soften a blank wall or create a welcoming transition between house and garden. This practical guide explains planning, foundations, framing, styling, lighting and how a pergola compares with other garden structures, so you can make decisions before buying materials.
Think of the project as permanent hard landscaping rather than a temporary garden accessory. Confirm local rules, check the patio and house, and plan for the sun, wind and services below ground. As you map the wider setting, courtyard garden design ideas for stone and water can help you coordinate the pergola with paving, planting and circulation.
Plan the Site Before You Build a Pergola
How to build a pergola on a patio begins with a measured plan and a clear purpose. Decide whether the structure will shade a table, support climbing plants, mark an entrance or provide a framework for evening lighting. Those uses affect its footprint, height, orientation and the position of posts. Sketch the patio to scale, noting doors, windows, steps, drains, outdoor taps and the route people naturally take across the space.
Observe the site at different times of day before settling on the location. In May or June, note where direct sun falls around lunch and early evening, and whether the house or a boundary already provides shade. A pergola with widely spaced rafters filters sunlight rather than making a fully covered room. If deep shade or reliable rain protection is essential, consider a retractable canopy or roof panels, and check whether that change affects local planning requirements.
Measure the usable area, not just the paving. Leave clear space around dining chairs so people can pull them back, and avoid placing posts where they obstruct a door swing or narrow a route. For a small patio, a simple rectangular frame aligned with the paving joints often looks calmer than a large structure that crowds the edges. A chalk outline or temporary stakes make it easier to assess the proportions before digging or ordering timber.
Inspect the patio surface and its edges. Slabs can hide compacted base material, drainage channels or services, and they are not automatically adequate footings for a permanent pergola. Check how water runs during heavy rain, whether paving slopes away from the house, and whether the proposed posts can be supported without undermining a wall or drain. For an uneven site, use practical steps for leveling a garden to understand grades and transitions before finalizing the layout.
Also confirm the rules that apply to your property. Height limits, boundary setbacks, conservation restrictions, landlord conditions and building codes vary by location. Ask the local authority or a qualified professional when requirements are unclear, especially if the pergola attaches to the house, sits near a boundary or carries a substantial roof. The according to RHS Garden Design guidance is a useful starting point for thinking about how a permanent feature fits the garden as a whole.
- Mark the intended footprint and check door, chair and walkway clearances.
- Locate buried utilities before any excavation.
- Choose a position that balances shade, views and access.
- Decide early whether the frame is freestanding or attached to a building.
Measure twice and treat the sketch as a coordination tool for the entire project. A considered location makes the construction safer and helps the finished pergola feel like part of the patio rather than an obstacle added afterward.
Choose Supports, Footings and a Sound Frame
How to build a pergola on a patio safely depends on a stable load path: rafters transfer weight to beams, beams to posts, and posts to footings or an engineered support system. Do not assume that a patio slab, deck board or lightweight post base can resist wind uplift and sideways movement. The suitable footing depends on soil, frost depth, drainage, structure size and local code. For a permanent build, use plans and hardware designed for the conditions, and ask a building professional to verify uncertain details.
Before digging, contact the relevant utility-locating service and mark water, gas, electricity and drainage routes. Check the slab thickness and condition if you plan to anchor to existing concrete; a surface paver is not the same as a structural footing. Where posts pass through or beside paving, detail the area to limit water pooling around the base. Keeping timber ends out of standing water helps reduce decay, but it does not replace proper structural support.
Choose a material that matches your maintenance tolerance and local climate. Pressure-treated softwood is often a practical, adaptable option, though cuts may need treatment according to the product instructions. Naturally durable cedar or redwood can offer an attractive grain and may require a different finish schedule. Powder-coated aluminum typically asks for less routine coating work, while steel requires an appropriate corrosion-resistant finish. Compare actual product specifications rather than assuming a material is maintenance-free.
Build in a deliberate order
- Set out the corners with stakes and strings, then check both diagonals to confirm a square footprint.
- Prepare footings or engineered anchors to the approved design and allow concrete to cure for the specified period if used.
- Install posts plumb, brace them temporarily and verify their spacing before fixing beams.
- Fit beams and rafters with corrosion-resistant connectors suited to the material and exposure.
- Recheck level, square and fastener tightness before removing braces or adding accessories.
Do not rely on long nails or improvised screws where a rated connector is required. Use exterior-grade fasteners compatible with the metal treatment and timber species; incompatible metals can corrode, and undersized hardware can loosen under repeated wind movement. Follow manufacturer instructions for pilot holes, edge distances and fastener counts. A common error is cutting every rafter before confirming the frame is square. That creates uneven overhangs and awkward corrections, so measure the completed beam positions first.
Freestanding and attached designs need different attention. A freestanding pergola must resist movement in both directions, while a house-mounted ledger requires a sound connection to suitable structural framing, not just cladding or trim. Flashing and water management matter where a ledger meets the building, because a poorly detailed connection can direct moisture into the wall. If you are not confident locating framing or specifying a connection, hire a qualified installer rather than guessing.
A modest, well-braced frame is usually more useful than an oversized one with questionable supports. Build to the approved dimensions, keep the structure maintained and treat unexpected movement, split posts or loose connectors as reasons to stop using the space until repairs are made.
Shape the Roof and Style the Garden Room
How to build a pergola on a patio includes designing the top so it gives the right balance of light, airflow and cover. Traditional rafters with open spacing create patterned shade and allow rain through. Closer-spaced slats provide more shade but can make the space darker and increase wind resistance. A fabric canopy, adjustable louvers or clear roof panels can change the function substantially, so check the load and fixing requirements rather than adding them casually to a frame designed for an open top.
Consider the angle of the sun and the orientation of the rafters. A south- or west-facing patio may need a shade sail or side screen during hot afternoon hours, while a north-facing space may benefit from a more open design that preserves brightness. If a climbing plant is part of the plan, leave room for its mature growth and do not expect foliage to create instant shade. A young vine may take several growing seasons to cover a meaningful area.
Select climbers for your climate, exposure and willingness to prune. Star jasmine (Trachelospermum jasminoides) is an evergreen choice in mild climates, but it needs a sheltered position in colder regions. Clematis varieties can provide seasonal flowers; choose a cultivar suited to the light and pruning group, and guide stems along supports rather than letting them tangle around electrical cables. For a fragrant, vigorous option in a suitable climate, wisteria needs a very robust structure and regular pruning. Its mature weight makes it a poor match for a lightweight kit pergola.
Use separate wires or a trellis fixed to a suitable surface to guide plants, rather than wrapping stems tightly around posts. Keep planting beds clear of footing access and allow airflow around timber. A pot can be easier to control on a paved patio, but choose a container large enough for the plant, provide drainage and plan for watering during dry spells. In April or early autumn, plant when local conditions are mild and roots can establish without severe heat or frozen soil.
Make the space comfortable and cohesive
Coordinate finishes with the house and existing paving. A natural timber finish can soften stone, while a dark painted frame may visually recede against foliage. Test stain or paint on an offcut first because color changes with sunlight and the grain beneath it. Use exterior-rated products and follow the label for surface preparation, drying weather and recoat intervals.
Arrange furniture after the posts and circulation paths are fixed. A table should sit under the most useful shade, with enough clearance to move around it. Add a narrow bench along an edge instead of filling a small patio with bulky chairs. Keep pots and low planting out of main routes, and use a repeat of two or three plant types to make the structure feel connected to the rest of the garden.
For a coherent outdoor room, think in layers: overhead rafters, vertical planting or screens, comfortable seating and a simple ground-level detail such as a planter or outdoor rug. Avoid blocking ventilation with solid panels on every side. Screens can improve privacy, but a fully enclosed feel may trap heat and make a small patio seem cramped. Start with one side and assess the result before adding more.
Integrate Lighting Safely and Creatively
Thoughtful pergola lighting ideas make a patio useful after sunset without turning it into a glare-filled work zone. Begin by identifying tasks: dining needs clear light on the table, while conversation benefits from softer light at eye level or below. A dimmable circuit or separate switching zones lets you move from practical brightness to a relaxed evening setting. Plan wiring routes and fixture positions before rafters are closed in or climbers cover the frame.
For permanent outdoor wiring, use a qualified electrician who understands local electrical codes and exposure ratings. Specify fixtures and connections rated for their location, and use appropriate outdoor cable, protection and controls. Do not staple indoor extension leads to posts or bury ordinary cable in a garden bed. Keep electrical components clear of irrigation spray and areas where water can collect. If the pergola is attached to the house, coordinate electrical penetrations with the weatherproofing detail.
Low-voltage systems can be appropriate for some landscape applications, but they still require outdoor-rated components and correct installation. Solar fixtures avoid a wired supply, although their performance depends on panel exposure, battery capacity and weather. Put a solar panel where it can receive useful daylight rather than under dense foliage or the roof itself. Follow the product instructions and position batteries where they can be inspected and replaced safely.
Layer the light instead of relying on one source
- Rafter lighting: Discreet outdoor-rated strip lighting can trace a beam or selected rafters, giving even ambient light without dangling wires.
- Task lighting: A properly mounted pendant or downlight can illuminate a dining table; check the structure and fixture specifications for support and weather exposure.
- String lights: Use outdoor-rated strands with suitable support points and a route that avoids low head clearance and sharp edges.
- Accent lighting: Shielded, low-level fixtures can highlight a planter, textured wall or climbing plant without shining directly into eyes.
- Portable lamps: Rechargeable outdoor lamps offer flexible placement, but should be brought in or stored as their instructions require.
A common mistake is choosing a bright, cool lamp because it appears impressive in a shop. On a patio, harsh light can flatten the garden and make the space less inviting. Choose a warm tone for a relaxed setting and use dimming or separate circuits to preserve flexibility. Aim light toward surfaces instead of across the seating area, and avoid shining it into neighboring windows or wildlife habitat.
Practical pergola lighting ideas also account for servicing. Leave access to drivers, transformers and junctions, and keep wires from rubbing against moving canopy parts. If using climbing plants, maintain a clear gap around fixtures and inspect it as growth develops. Test the arrangement after dark before fixing every clip permanently; a temporary setup reveals shadows, glare and dark patches more reliably than daytime planning.
Combine modest ambient light with one well-positioned task source rather than installing many high-output fixtures. This saves energy, keeps the garden’s nighttime character and makes it easier to adapt the patio for dinner, reading or quiet conversation.
Compare Structure Costs, Maintenance and Long-Term Value
The pergola vs gazebo cost comparison is not just a question of buying a frame. Total project spending depends on size, material, footing work, roof options, delivery, professional labor, electrical work and site access. A simple open pergola is often a more economical starting point than a fully roofed, enclosed gazebo, but that is a relative comparison, not a fixed rule. A custom, oversized pergola with premium finishes can exceed the cost of a modest prefabricated gazebo.
Ask for itemized estimates that separate the structure from preparation and optional upgrades. A patio needing excavation, new footings or repairs may drive the project total more than the frame itself. Electrical work, privacy screens, a retractable canopy and climbing plants add separate costs. Request comparable specifications from suppliers: dimensions, material grade, roof style, connector details, finish, warranty and what installation includes. A lower quote may omit essential anchoring or weatherproofing.
In broad terms, open pergolas tend to use fewer enclosed components and offer a flexible framework for shade, plants and lights. Gazebos usually have a defined roof and may include screens or walls, so they offer more shelter and privacy but often involve more material and a larger, more complex assembly. Pavilions and covered patio extensions can deliver deeper weather protection, yet may need more substantial construction and approvals. Compare like with like: a basic pergola and an enclosed gazebo serve different purposes.
Choose the structure by how you will use it
- Pergola: Best when filtered shade, an open feel and a framework for plants or lights are priorities.
- Gazebo: Better suited to users seeking a defined roofed retreat, often with more protection from sun and light rain.
- Pavilion: A stronger candidate for a large, consistently covered gathering area, subject to local rules and structural design.
- Retractable canopy: Useful when adjustable shade matters more than a permanent solid roof, though fabric and mechanisms need care.
Maintenance is part of the long-term comparison. Timber may need periodic cleaning, inspection and refinishing; frequency depends on species, finish and exposure. Metal frames can require checks for coating damage, loose connections and corrosion. Fabric canopies need cleaning, drying and seasonal care according to their instructions. After winter storms, inspect posts, connectors, roof attachments and lighting. Remove debris before it traps moisture or adds weight.
Price is only one measure of value. A pergola that fits the patio, supports the intended plants and provides useful evening light may be better value than a larger structure that blocks a route or stays unused. When comparing a pergola vs gazebo cost, include the value of the shelter you actually need: if you want full rain cover, a basic open pergola may require later upgrades. If filtered shade and an airy garden room are enough, paying for enclosed walls may not make sense.
Before committing, get written quotes, verify warranties and ask who is responsible for permits, disposal and final inspection. Staged spending can help: establish safe footings and framing first, then add planting, a canopy or lighting when the budget allows. Do not economize on structural supports, weather-rated electrical components or professional checks where they are required. These are safety-critical elements, not decorative extras.
One final planning check is how the structure connects with the whole garden. A pergola can frame a view toward a pond or planting border, but keep access open for maintenance and avoid casting unwanted shade on sun-loving beds. Compare the finished footprint against your original sketch and revisit the plan if the patio feels crowded. A useful structure leaves room for people, plants and everyday tasks.
The Royal Botanic Gardens, Kew publishes further plant care guidance worth reading alongside this guide.
Frequently Asked Questions
Can I build a pergola directly on patio pavers?
Usually, pavers alone should not be treated as structural footings. The right support depends on the design, soil and local requirements. Pavers may need to be lifted so an approved footing or engineered anchor can support the posts. Have the proposed connection checked before construction, especially where the pergola is large or exposed to strong winds.
How tall should a patio pergola be?
Choose a height that allows comfortable headroom, suits the building and keeps the structure in proportion to the patio. Check local height limits and consider whether the roof, a canopy or hanging fixtures reduce clearance. Mark the proposed beam height temporarily and view it from inside the house as well as from the garden.
What are simple pergola lighting ideas for a small patio?
Try a dimmable, warm-toned strand along one beam, paired with a portable outdoor lamp on the table. This keeps the arrangement uncluttered and avoids bright light at eye level. Choose products rated for outdoor use, route cords safely and use a qualified electrician for permanent wiring.
Is a pergola cheaper than a gazebo?
Often, a simple open pergola can be less expensive than a similarly sized roofed gazebo because it uses fewer enclosing components. However, custom materials, footings, labor, screens and lighting can change the comparison. For a useful pergola vs gazebo cost estimate, compare complete, equivalent specifications rather than headline kit prices.
Does a pergola need a permit?
Requirements vary by location and can depend on height, footprint, roof type, setbacks, attachment to a house and property restrictions. Contact your local planning or building department before buying materials. A freestanding open frame may be treated differently from a covered structure, so describe the intended design accurately.
Which plants work well on pergolas?
Choose a climber suited to your climate, sun exposure and structure. Star jasmine suits mild, sheltered settings; clematis offers many flower colors and growth habits; and wisteria needs a robust frame and regular pruning. Check mature size, root needs and pruning instructions before planting, and keep growth away from lights and connectors.
Conclusion: Build a Pergola That Fits Your Patio
Successful how to build a pergola on a patio planning is a sequence: measure the site, confirm rules, design stable supports, choose a suitable roof and coordinate lighting and planting. Compare structures by the shelter and maintenance you need, not by appearance alone. Make a sketch, request detailed estimates and check the relevant local requirements before work begins. For more practical ideas to shape your outdoor space, explore garden design and practical gardening advice at Blossom Gardens Hub.
