
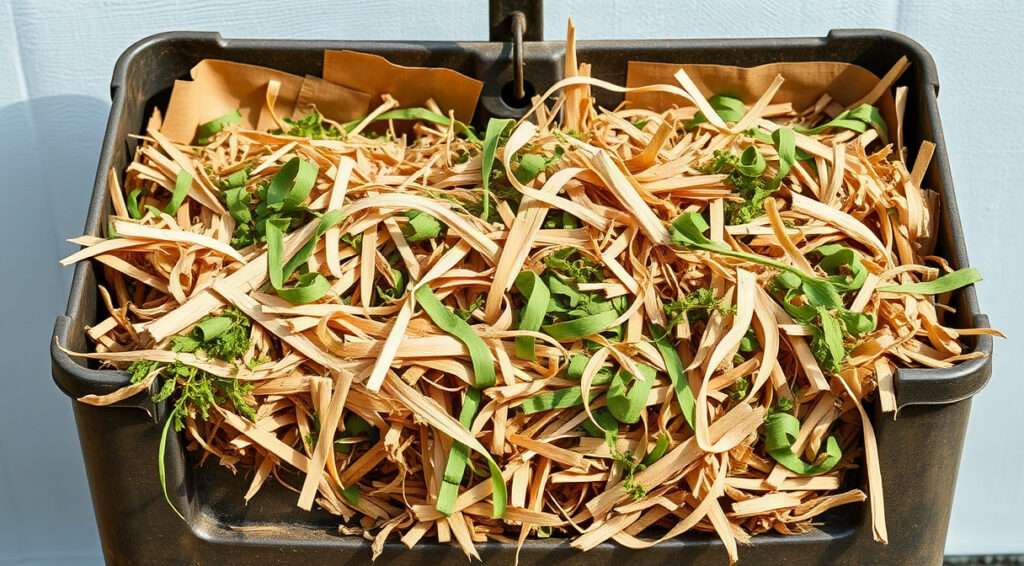
Composting cardboard at home turns clean boxes and paperboard packaging into a useful source of carbon for garden soil. The key is to remove unsuitable materials, shred the rest so it breaks down efficiently, and combine it with nitrogen-rich greens such as fresh grass clippings, vegetable scraps, or garden trimmings. With a few simple habits, cardboard can help create a balanced compost pile instead of a dry, stubborn stack of packaging.
This guide explains what cardboard is safe to compost, how to prepare it, how to judge the carbon nitrogen ratio balance, and how to solve common problems. You will also find practical advice for a cardboard worm bin setup, where moisture and texture matter especially much.
Why Composting Cardboard at Home Works
Cardboard is a brown, carbon-rich compost ingredient. Microorganisms use carbon as an energy source, while nitrogen supports growth and reproduction. A pile with too little carbon can become wet and smell unpleasant; a pile with too little nitrogen may sit unchanged for weeks. Cardboard helps provide structure and absorb excess moisture, making it a useful counterweight to food scraps and fresh plant material.
It also offers a practical way to reuse plain packaging rather than sending it to the bin. Small pieces can help create air pockets in a compost heap, especially when mixed with dense, moist greens. The result is not instant fertilizer: decomposition takes time, and finished compost should look dark and crumbly, with most original materials no longer recognizable.
Choose suitable cardboard
Good choices are plain, uncoated corrugated boxes, brown paperboard, and unprinted cardboard tubes. Remove packing materials and use judgment with printed boxes. A small amount of ordinary ink on otherwise plain cardboard is generally less concerning than glossy, waxed, plastic-coated, or metallic finishes. When a coating is difficult to identify, leave that piece out.
- Usually suitable: clean shipping-box layers, plain cereal-style paperboard, and cardboard tubes.
- Remove first: plastic tape, staples, shipping labels with plastic backing, and foam or plastic inserts.
- Leave out: waxed produce boxes, laminated or glossy board, heavily soiled packaging, and cardboard contaminated with oil, chemicals, or cleaning products.
Food-soiled cardboard needs special care. A small, uncoated piece with a trace of ordinary food residue may break down, but greasy pizza-box sections can attract pests and form a dense, slow-decomposing mat. Tear off clean sections for the pile and discard heavily greasy parts through an appropriate local waste stream. Do not compost packaging that has held chemicals or unknown substances.
Understand the role of browns
Cardboard is not a complete compost recipe. It contributes carbon, but a pile made mostly from boxes lacks the moisture and nitrogen that decomposers need. Think of it as one ingredient in a mixture, not a substitute for a balanced range of materials. Pair it with greens, mix it into the pile, and keep the material damp like a wrung-out sponge.
For an efficient routine, keep a small supply of prepared cardboard near your compost area. Add it whenever kitchen scraps or fresh trimmings make the pile unusually wet. This measured approach is more reliable than emptying a large box into the bin all at once.
Safe Preparation for Composting Cardboard at Home
Preparation is simple, but it makes a noticeable difference to how quickly cardboard breaks down. Large flat sheets restrict airflow and can form layers that water cannot pass through. Smaller pieces expose more surface area to moisture and microorganisms. Tear or cut cardboard into pieces roughly 1 to 2 inches wide; for a small household bin, narrower strips are often easier to mix.
Remove contaminants before shredding
Flatten boxes and check folds, seams, and corners for tape, labels, staples, plastic windows, and cushioning. Pull off tape rather than relying on it to disappear in the pile. Remove labels when they are plastic-backed or heavily coated. If a staple is hard to find, inspect folded seams carefully before tearing, especially when preparing cardboard by hand.
Plain brown cardboard can be torn by hand, cut with sturdy scissors, or processed with a paper shredder that is rated for the material. Do not force thick corrugated board through a household shredder that is not designed for it. Wear gloves if the cardboard is rough or has sharp edges, and use clean tools. Keep the work area dry so small scraps do not become a slippery mess.
- Flatten each box and remove tape, staples, labels, and inserts.
- Sort out shiny, waxed, laminated, greasy, or chemically contaminated pieces.
- Tear or cut the suitable cardboard into small strips or squares.
- Dampen very dry pieces before adding them, then mix them with other ingredients.
Use a safe, manageable amount
When composting cardboard at home, add it in batches rather than storing a towering, dry layer inside the bin. A handful or small bucket of shredded cardboard is easier to distribute than a whole flattened carton. If you have a large box, prepare it gradually and keep the surplus dry in a paper bag or covered storage spot.
Moistening cardboard helps it settle into the pile, but soaking it until it becomes a soggy wad can reduce airflow. Sprinkle water over strips or briefly dip and drain them. Mix dampened cardboard through the compost rather than packing it tightly against the bin wall. A well-mixed batch should feel moist without dripping when squeezed.
Do not burn printed or coated packaging to make a substitute soil amendment. Do not use cardboard scraps around edible plants as mulch if the material has unknown coatings or contaminants. If local rules distinguish between compostable paper products, follow the guidance for your collection or backyard system. The according to RHS Composting Guide resource explains general composting principles and suitable materials.
Preparation also makes the pile easier to turn. Small, loose pieces blend with leaves and greens; long, intact sheets tend to wrap around a fork or create pockets. If you notice a sheet during routine turning, pull it apart and redistribute it. This simple check prevents cardboard from remaining a recognizable layer long after the surrounding material has decomposed.
Get the Carbon Nitrogen Ratio Balance Right
Compost recipes are often described using a carbon-to-nitrogen ratio, but home composters do not need laboratory measurements. Cardboard varies by thickness and processing, while fresh greens also differ in moisture and nitrogen content. Use a practical starting point: mix roughly two to three parts loose brown material with one part green material by volume, then adjust by observing moisture, smell, and activity.
In this guide, carbon nitrogen ratio balance means maintaining enough carbon-rich material for structure and energy alongside enough nitrogen-rich material for active decomposition. Cardboard counts as a brown. Fresh grass clippings, vegetable and fruit scraps, coffee grounds, and young green weeds count as greens. Dry leaves are another brown, while food scraps are usually wetter and more nitrogen-rich.
Build a balanced batch
Start with a loose layer of dry leaves or shredded cardboard at the bottom of a new batch. Add a modest layer of greens, then cover them with brown material. Continue in thin layers, or mix ingredients together in a garden fork or wheelbarrow. A useful small-batch example is one bucket of vegetable scraps, one bucket of fresh grass clippings, and two or three buckets of torn cardboard and dry leaves combined.
That recipe is a starting point, not a rigid formula. If the greens are very wet or packed tightly, add more cardboard. If the mixture is dry, fibrous, and barely changing after several weeks, add a little more green material and water. The aim is an evenly damp, springy mix with enough air spaces for organisms to work.
- Wet, fresh greens: balance with dry cardboard or leaves and mix thoroughly.
- Dry browns: add moist food scraps or fresh green trimmings, plus water if needed.
- Dense clippings: mix with torn cardboard instead of leaving them in a compact layer.
Fresh grass deserves particular attention. A thick, unmixed heap of clippings can heat, mat together, and develop an unpleasant smell. Let clippings wilt briefly if you have a large amount, then blend them with cardboard or dry leaves. Vegetable scraps also benefit from being buried in the center of the pile and covered with browns, which helps deter flies and rodents.
Manage moisture and air together
Water and oxygen are as important as the ingredient ratio. A pile that is too wet may lose its air spaces, while a dry pile slows microbial activity. Squeeze a small handful: it should feel like a wrung-out sponge, with at most a few drops of water. If water runs out, add dry shredded cardboard and turn the material. If it crumbles without feeling damp, sprinkle water as you mix.
Turn the pile every one to three weeks when practical, or whenever you add a large fresh batch. You do not need to turn a small, slow compost system on a strict schedule, but occasional mixing redistributes moisture and oxygen. For additional guidance on interpreting ingredients and managing a home pile, consult this Colorado State University Extension guide to composting yard waste.
If you are also improving a patch of uneven ground, finished compost can be one part of a broader soil-preparation plan. See these practical steps for leveling a garden before spreading soil amendments.
Plan a Cardboard Worm Bin Setup
Worm bins can process modest amounts of soft, damp cardboard alongside food scraps. Cardboard acts as bedding and helps absorb excess moisture, but worms need a breathable, consistently moist habitat rather than a dry box full of paper. A cardboard worm bin setup works best when cardboard is mixed with established bedding, such as shredded uncoated paper or coconut coir, and food is introduced gradually.
Prepare the bin and bedding
Use a sturdy, opaque container with a secure lid and ventilation holes. A common home-scale bin is around 8 to 12 inches deep; shallow bins are easier to aerate and harvest than very deep containers. Set it on a tray to catch accidental drips, keep it out of direct sun, and choose a stable location where temperatures remain moderate. Avoid a spot that freezes or becomes hot in afternoon sun.
- Shred plain cardboard into strips and soak or sprinkle it until evenly damp.
- Loosely fill the bin with bedding, leaving air spaces rather than pressing it down.
- Add a small amount of food scraps and cover them with bedding.
- Wait until the scraps are being consumed before adding another small portion.
Red wigglers, commonly sold for vermicomposting, are often used in home worm bins. Do not collect earthworms from garden soil and assume they will thrive in a bin; many are adapted to different conditions. Follow the supplier’s guidance on stocking, and introduce worms only after the bedding is moist and prepared. A good bedding handful feels damp but does not release a stream of water.
For a new cardboard worm bin setup, begin with a modest amount of food, such as a small handful of chopped vegetable scraps. Bury scraps in one area, cover them with a few inches of bedding, and check that spot before feeding again. Too much food left to rot can create odor, attract pests, and warm the bedding. Avoid meat, dairy, oily leftovers, and large quantities of citrus in a beginner bin.
Maintain bedding without overfeeding
As cardboard softens, add fresh strips to maintain a loose bedding layer. Check moisture weekly: add damp bedding if the bin is too wet, or mist it lightly if the material feels dry. Do not pour water into the bin without checking drainage. If bedding compacts, gently loosen the top layer with a hand fork, taking care not to injure worms.
Worm bins need patience. Food may take days or weeks to disappear, depending on temperature, worm population, and how finely it is chopped. Feed only when the previous portion is mostly consumed. Keep a note of where food was buried so you can check progress without disturbing the entire bin each time.
If the bin smells sour or rotten, pause feeding, remove any untouched excess food, and add dry shredded cardboard. If worms cluster at the surface or try to escape, check for overheating, excess water, poor air circulation, or an unsuitable pH from too much food. A balanced bedding layer and a restrained feeding routine are more effective than repeated large corrections.
Troubleshoot Slow, Wet, or Smelly Compost
Compost changes slowly, and cardboard can remain visible longer than tender leaves or food scraps. Before changing the recipe, check three things: moisture, airflow, and the size of the cardboard pieces. A dry, tightly packed heap will not break down quickly, while a saturated heap can become oxygen-poor. Make one adjustment at a time, then give the pile several days to respond.
Diagnose common problems
- Cardboard is still intact: tear it smaller, dampen it, and mix it with greens. Large sheets have little exposed surface and can form a barrier to water and air.
- The pile smells sour or rotten: it is often too wet or compacted. Turn it and mix in dry cardboard or leaves until it feels moist, not soggy.
- The pile is dry and inactive: add water gradually and blend in fresh greens. Dry cardboard can absorb moisture before the rest of the pile gets damp.
- Flies gather near food scraps: bury scraps in the center and cover them with several inches of browns. Remove food that is attracting pests.
- There is no noticeable warmth: a small bin may not heat up even when decomposition is underway. Check whether ingredients are damp and mixed before adding more greens.
Not every home compost pile becomes hot. Small batches, cool weather, and frequent additions can prevent a sustained hot phase. That does not automatically mean the compost has failed; it may simply decompose more slowly. Keep unsuitable materials out, give the pile time, and make sure it is not waterlogged or completely dry.
Adjust by season and location
In spring and autumn, outdoor piles often have enough mild weather for regular decomposition, but rain can saturate cardboard and food scraps. Cover the bin with a lid or breathable tarp during long wet spells while leaving some ventilation. In summer, check moisture more often, especially if the bin sits in sun or the pile contains a lot of dry browns.
In winter, decomposition may slow as temperatures fall. Store prepared cardboard dry and add it as needed; do not pack a frozen bin full of paper and expect quick results. When activity resumes in spring, break up any dense layers and mix in fresh greens. If you live in a rainy climate, choose a well-drained site rather than setting the compost bin in a depression.
Common mistakes include adding a whole box at once, leaving cardboard in unbroken sheets, and responding to a smell by adding still more food scraps. Each can make the original problem worse: the first two restrict mixing and airflow, while extra food increases moisture and odor. Correct the cause instead. For example, turn a wet pile and add dry browns rather than layering more scraps on top.
Once the material is dark, crumbly, and earthy-smelling, screen out large pieces that have not finished. Return those scraps to a new batch. Mature compost can be mixed into garden soil or used as a light top-dressing around established plants, keeping it away from direct contact with stems. It can support soil structure, but it should not replace a suitable growing medium for every plant. Gardeners working to reduce plant damage may also appreciate these organic slug-control methods as part of a wider garden care routine.
Frequently Asked Questions
Can I compost cardboard with printing on it?
Plain, matte cardboard with ordinary printing is generally a reasonable choice in a home pile, especially in small amounts. Avoid glossy, laminated, waxed, metallic, or plastic-coated packaging, and leave out pieces with unknown chemical contamination. When uncertain, use only the clean, uncoated sections.
How much cardboard should I add to food scraps?
Begin with about two or three loose volumes of browns, including cardboard and dry leaves, for each volume of wet greens. Then adjust according to the pile: add more browns if it is wet or smells sour, and add greens or water if it is dry and inactive. Volume is a practical guide, not a precise laboratory measurement.
Can cardboard go in a worm bin?
Yes. Shredded, uncoated cardboard can provide bedding and absorb moisture in a worm bin. Keep it loose and evenly damp, cover food scraps, and feed small amounts only after the previous portion is mostly consumed. A cardboard worm bin setup needs ventilation and a moderate temperature as well as suitable bedding.
Why is my cardboard not breaking down?
It may be too large, too dry, or separated from the rest of the compost in a dense layer. Tear it into smaller pieces, moisten it, and mix it with greens and other browns. A cool or small pile can also take longer, so allow several weeks and check conditions before assuming the material is unusable.
Should I soak cardboard before composting?
You do not need to soak every piece. Dry strips can be added directly if the pile is already moist. If cardboard is very dry or the compost needs more moisture, dampen the pieces first and let excess water drain. The goal is moist material, not a dripping, compacted wad.
Is compost made with cardboard safe for vegetable gardens?
Compost made from clean, suitable materials can be used in vegetable gardens once it is mature and earthy-smelling. Keep coated or contaminated packaging out, and do not use unfinished, hot, or foul-smelling material around crops. When using compost for seedlings or container growing, blend it appropriately rather than treating it as a complete potting mix.
Conclusion
Composting cardboard at home is straightforward when you choose clean, uncoated material, remove tape and labels, and shred it into manageable pieces. Combine cardboard with greens, adjust moisture and airflow as the pile changes, and be patient when a small or cool compost system works slowly. Use the same measured approach in a worm bin, where bedding and restrained feeding help maintain healthy conditions.
Start with one small batch this week, observe how it feels and smells, and adjust before adding more. For more practical ideas to support your garden, explore Blossom Gardens Hub.
